Saturday, January 31, 2015

Inked Backgrounds and Adding texture

I kept up with my homework for exactly 2 days...then fell behind.  Then I caught up days 3 and 4, but didn't photograph or blog it until the weekend.

 http://onlinecardclasses.com/CS4/wp-content/uploads/2015/01/CS4_participant.png

DAY 3 - Inked Backgrounds
I had some trouble with the techniques on this one. I have 11 front panels in the trash.  The gesso really was a tough one, my first attempt the gesso pulled up a layer of paper off my panel when I pulled the stamp away...I had to double check the jar to make sure it was gesso and not some glue.  That was a fun stamp cleaning session. No baby wipe and run...


I stamped Penny Black's Love is in the Air with white gesso on the card panel, let it dry and then used some HA Passion Flower ink with water to add color to the panel.  I couldn't resist a bit of gold Heidi Swap mist droplets as well. then some gold thread under a gold heat embossed sentiment from the same stamp set. This was the 4th attempt, and the best of the lot. Tough technique for me.

Next up is stamping on  inked panels with versamark.  I used HA Cup of Joe and Wet Cement to color the white panel.  Lawn Fawn's Wood Grain Backdrops was used to create the wood panel, and the "carved" heart. I added a white heat embossed sentiment from SSS Chalkboard Love.

Lastly was the velveteen stamping.  I have tried something similar with the kissing technique--but rarely had the results I was hoping for.  This technique had the white layer put to the card, then the color layer ontop of the dried white layer of stamping.  You can see the HA houndstooth background on the red heart from SSS Chalkboard Love.  The sentiment is from SSS Valentine Spoons.  This last technique was my favorite of the day, probably because it was accomplished in fewer attempts.


Day 4 - Adding texture
 This was so far my favorite day, but I have yet to check out Day's 5 and 6.

This was all about adding texture, and I loved all the examples and loved working on all the cards.
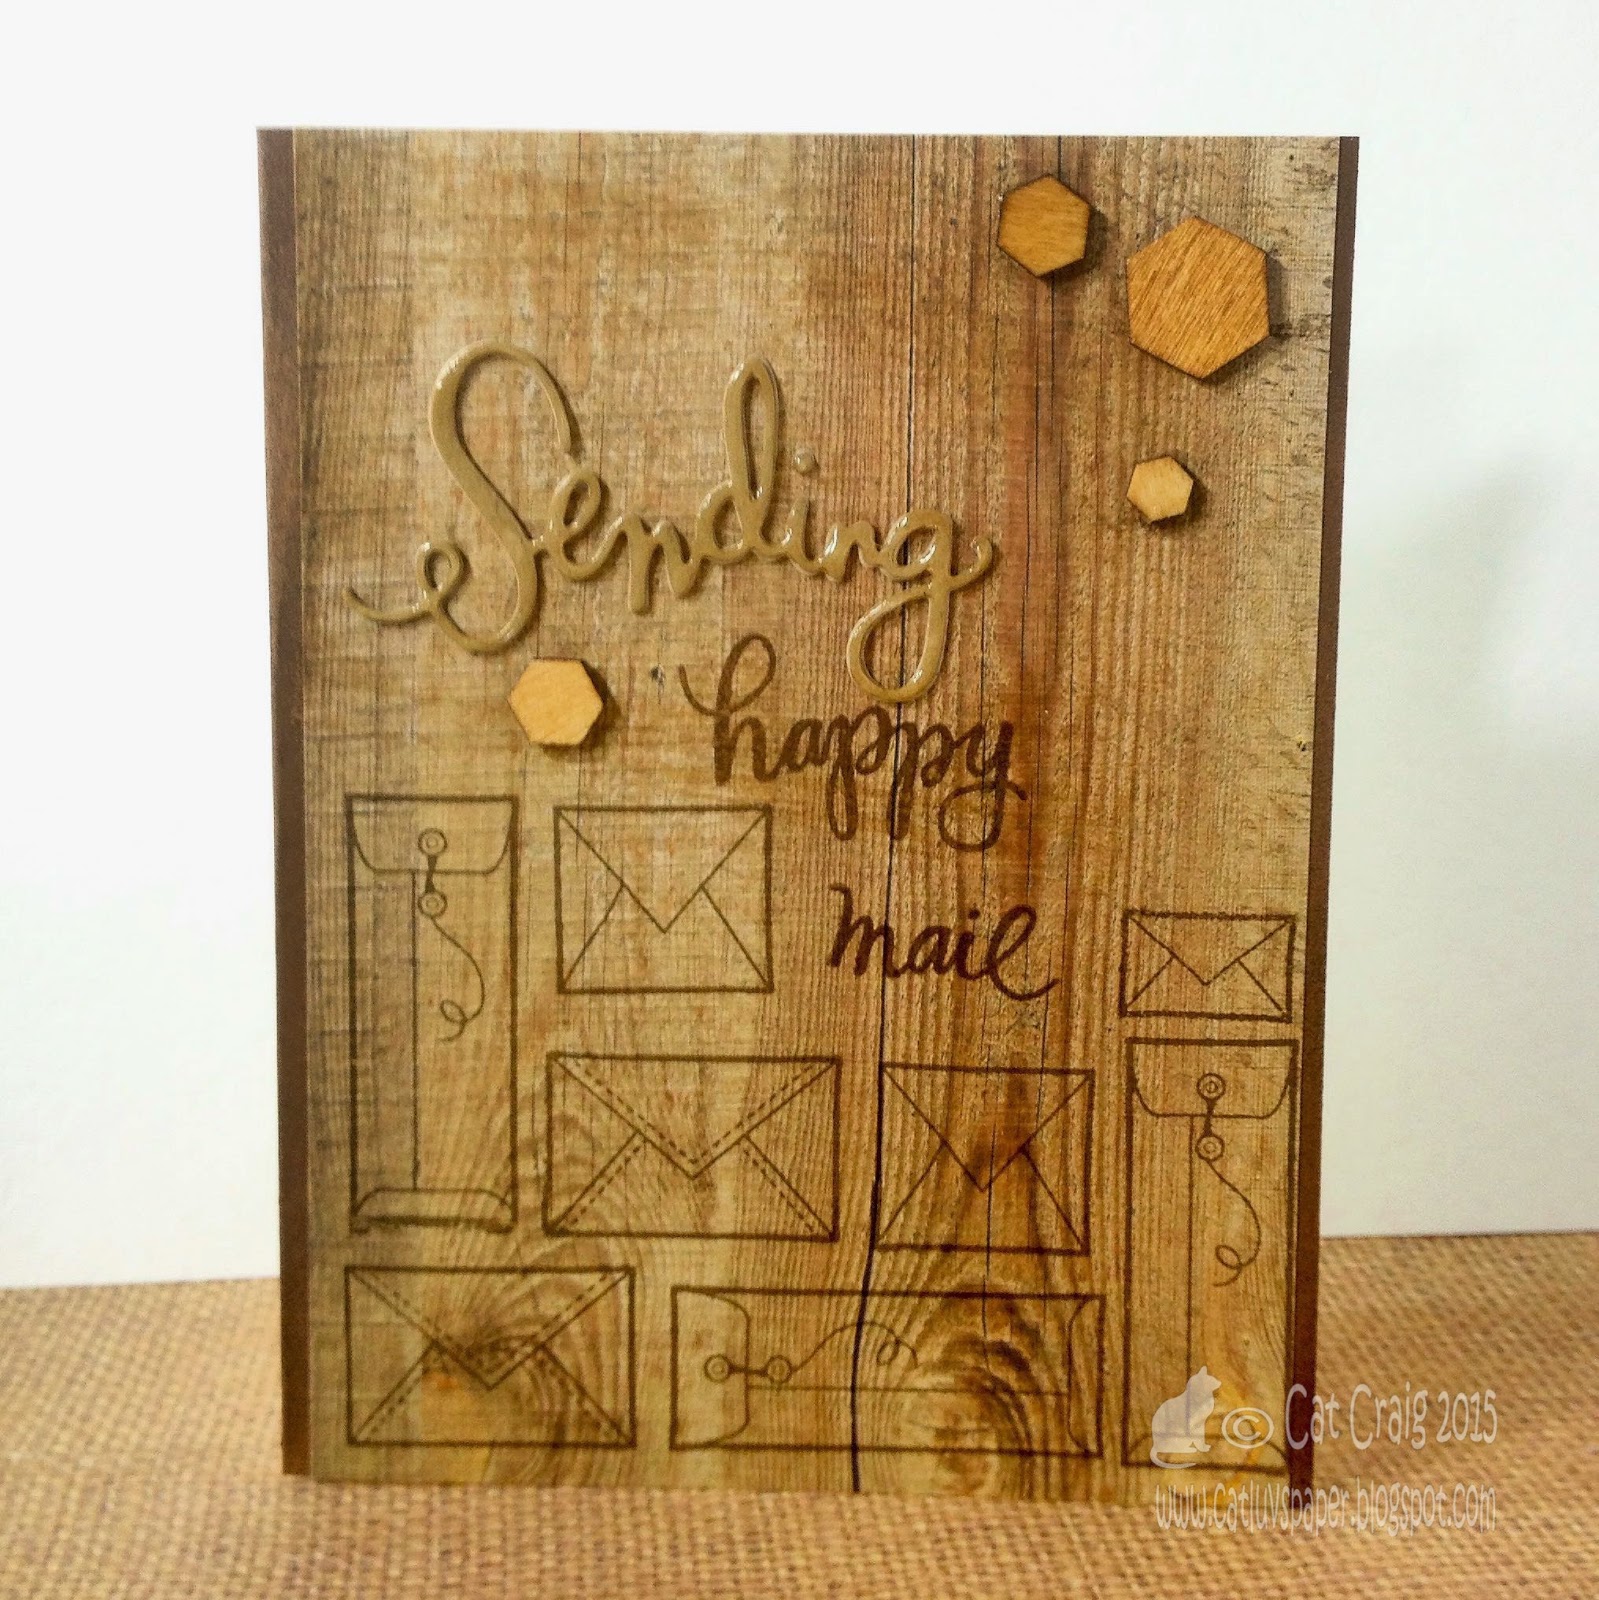
I have been wanting to try this faux embossing technique of adding die=cuts to the card panel in the same paper as the card base. The best tip was to adhere the die-cut paper to a sticky backing before cutting. It made laying these words down so much easier. I used SSS's Wishing die, and the Sending and Wishing stamp set, along with Valentine spoons for the sentiments.

The sewing was kind of fun and relaxing. I laid the big heart from SSS's Chalkboard love onto a white panel and took my piercer and punched holes around it.  Then I strung embroidery floss (3 strands) around the holes in random order...meaining sometimes I hit a hole twice or more.

I used a die from PTI's Happy trio and the word Valentines from the SSS stamp set Valentine Spoons to create the sentiment.  My main panel was cut using SSS Stitched rectangles.

My most favorite technique of the day and so far the class used my two favorite techiniques, water colors and embossing paste.
I used Heidi Swapp color mists in Primrose and Gold for the watercolors. I wet the water color paper then dribbled some drops of mists from the spritzer tube onto the paper. I added a bit more water with a brush then let it dry.  The two stencils I used are from SSS - Falling hearts, and Leaves I used white embossing paste, the hearts first as they covered more of the card base, then when that was fairly dry I added the leaves.  My sentiment was heat embossed in gold on vellum. I used the PTI sentiment set Keep it Simple Valentine Mini.  I saved my favorite for last.  Hope you are enjoying your weekend.  I will probably catch up with the next two class days sometime over the weekend.

Thanks for stopping!


Friday, January 30, 2015

January Card Chain Challenge

2015-01I love Deborah's Card Chain Challenge.  Make a card, send it and get one from another crafter.  Deborah provides several prompts for your card, you can choose from several and use as few as one or as many as you like.

Each month includes a color palette, a sketch, and variable choices. This month included themes of snow, friendship, or Valentine's Day, as well as stencils or embossing paste. 

I chose the color palette, the sketch, and the friendship theme,


2015-01


My card started with several white embossed flowers, and sentiment. Once they were fully dried I grabbed several distress inks and added color to the card front.  Once this dried, I spritzed it with pearlized water to add a subtle shimmer. I really love the color palette this month.

I also added a bit of the color combination to the inside right side.

Sign ups are going on right now for the February exchange click the link ->  February Card Chain Challenge Post.

Thanks for stopping by!

Supplies:
Hero Arts white embossing powder
Versamark ink
Distress inks - Salty Ocean, Peacock Feathers, Dusty Concord
Stamps - Simon Says Stamp Thinking of you; A Muse Studio Everyday Greetings
Neenah Aspen White 110lb Cardstock


Wednesday, January 28, 2015

CAS4 Day Two

Three cards today, one for each of the examples today which all involved Die cutting.


This wasn't quite what I envisioned when I started making the card, but I cannot say that I am displeased with the outcome. The card has a bit more impact in person, the gold embossing shines, and the gold glitter paper really glistens.  I started with white paper, stamped - embossed - inked - diecut then mounted the panel onto a card front.  Supplies - SSS -Valentine Spoons Stamp Set, Mama Elephant Heart Border Die, Distress inks Milled Lavendar, Tattered Rose, Worn Lipstick, Embossing powder Hero Arts Gold.

Debbie Hughes made a spectacular card out of bits and pieces from various dies, and mounted it onto dark grey cardstock.  This took time.  I didn't have the dies she used, some but not all.  However, this is a definitely a very close CASE of her card. Patience is the key word.  Dies - SSS - Heart Wreath, Fresh Daisies, Love You small; Memory Box- Precious Hearts, Prim Poppy, Mini Heart Collection; Elizabeth Craft- Bunch of flowers.

Shari Carroll made an amazing card with the feathers, fun foam and all her special little bits and pieces.  I need Valentine cards, so this went a bit off the rails from her card, however 97% of it is a CASE of her project. Dies-SSS-Pointed Feather, Lawn Fawn - Party Banners, SSS - Moonshine sequins, DCVW Glitter Paper, Stampin Up Washi Tape, Fun Foam, Hero Arts Pool Ink.


The class as usual is fantastic. These instructors are so very talented.  Give it a try if you can.

Thanks for stopping by!


Tuesday, January 27, 2015

More Valentine Cards

As are many people, I am taking the latest Online Card Class - Clean and Simple 4 - Techniques made simple.  I will be using the techniques to further my stash of Valentine cards.

Today's lesson was about embossing, multi color embossing, shadow embossing, and creating a tile look with die embossing.  I decided to try the multi color embossing.

I started by inking my large background stamp with versamark and stamping it on to a card panel.  I cut a heart shape out of some 2 inch post it tape and taped it down over the area I did not want to cover with embossing powder.  Then I pile a soft pink embossing powder all over the card.  I set the powder by applying heat.

Once that was set, the heart mask was removed and I placed the negative around the unembossed area.  I added some deep pinky red embossing powder, and heat set that as well.  Because the pattern was a bit more open that I would have preferred, I added some pigment ink to the interior of the heart to make the shape more vivid.

A vellum strip with a silver embossed sentiment was wrapped around the panel, which was then adhered to a card base. Two thin strips of glitter paper were added as frames and the card is finished.  Is it still clean and simple?  I have no idea...but I do love this card.

Thanks for stopping by!

Supplies:
Stamps - Hero Arts Leaf and Floral Background, PTI Keep it simple Valentine mini
Cardstock - Stampin Up Whisper white, DCVW
Inks - Versamark, Mama Elephant-Lollipop
Embossing powder - Stampendous

Monday, January 26, 2015

Golden Hearts

I am getting a start on my Valentines.   I am using a new product to me on this card.  Its is Bo Bunny glitter paste in Gold.  It is basically clear embossing paste stuffed full of glitter.  It has and keeps more dimension than stickles, and the glitter ratio is much more dense in the paste.

I used the Simon Says Stamp stencil Falling Hearts.  I had sprayed the back of the stencil with repositional spray adhesive earlier in the fall.  For this paste it is a very good idea that the stencil is firmly against your cardstock.  That glitter does like to wander.

I spread the glitter paste along the stencil, then lifted it off.  I let it dry about 10 minutes.  Then I heat embossed the PTI sentiment in gold.   A few wraps of gold string and my card was finished.

I am submitting this card to the Simon Says Wednesday Challenge - Have a Heart, and the Simon Says Stamp Flickr challenge #11- Love theme.  I really got my inspiration from their challenge photo.


Thanks for stopping by!

Friend

The first of my valentines was made for CAS-ology week 130 - FRIEND.

It was the most fun of all the cards I made today, and I think it shows.  I started with watercolor paper, and free hand drew a heart with a wet brush.  Then I touched that space with a very wet watercolor loaded brush.  I let the color go where it wanted to inside that heart. I added a bit more clear water to help it fill out the shape.  Then I LEFT IT ALONE.

My laptop sits on a cooling pad with little fans, and that is up a bit from my table top giving me the perfect little place to slide my wet card panels. They dry more quickly than sitting in the open, and I get fewer mishaps than drying with a heat tool.


The silver embossed sentiments came next, and because white space makes me itch...I added a tiny bit more of that vibrant pinky-red by cutting a curve on my watercolor panel and mounting it onto the cardstock off set just a bit.  And, since I wanted that silver to make more of a statement  I added some glitter paper at the bottom of the card.  I am not sure if it is still a CAS card, but I do love it and I could easily reproduce it.


Thanks for stopping by!

ETA- also submitting to SSS Flickr challenge#11

Supplies:
Watercolor Paper - Canson
Watercolors - Koi
Embossing Powder - Hero Arts, Versa Mark Ink
Stamps - Simon Says Stamp Friendship Messages, PTI Keep it Simple Valentine Mini
Die - Simon Says Stamp A2 Card Curved Edge
Glitter Paper - DCVW

Sunday, January 25, 2015

Color Throwdown #326

Here is my second post for the evening.

http://colorthrowdown.blogspot.com/2015/01/color-throwdown-326.html

                                            Click on the photo to be taken to the challenge page


Supplies:
Cardstock - random pieces in my stash
Die- Simon Says Stamp Partial Cut Flowers
Stamp - Hero Arts Have a great day
Sequins - A Muse


Mojo Monday #381


Three posts tonight...

http://mojomonday.blogspot.com/2015/01/mojo-monday-381.html 

Click on the graphic above to go to the challenge.


Supplies:
Die - Memory Box Delicate Vine
Embossing Folder - Provo Craft Swiss Dots
Stamps - Stampin Up Lotus Blossom; Hero Arts Have a great day C5647
Inks - Hero Arts Bubble Gum, Passion Flower (a version that was more pink than purple) Simon Says Stamp Green Leaf
Papers - Out of my scrap bin, and some Stampin Up Whisper White

Saturday, January 24, 2015

A tag for

The Tag You're It challenge.  I am not usually a tag maker.  If I make a tag it is going to end up on a card sooner or later.  I really loved the sweet tag made by Heather Campbell, and her remake of her own tag. Click on the link above and check them out.

I inspired by the double layer, the colors, and the sweet little bow on top. 

Here is my take on the inspiration:


I cut the tag die twice, once out of card stock and once out of a small sheet of polka dotted vellum which I have been saving forever. I stamped the sentiment, then the kitty cat and the flowers.  The flowers have inverted 4 mm sequins as their centers, it adds a bit of shine. The cat was colored with pencils and blended lightly with gamsol.  The bow was cut from another scrap of heart dotted paper.

Thanks for stopping by!

Supplies:
Die - Pretty Pink Posh  Stitched Duo 3
Stamps - Mama Elephant Purrfect Pair; Simon Says Stamp Sending Happy Thoughts
Inks - Memento Tuxedo Black, A Muse Grapefruit, Mama Elephant Mojito
Pencils - Artist's Loft, gamsol bottled by Inky Antics, paper stump for blending
Sequins - Pretty Pink Posh


Thursday, January 22, 2015

Create a background

I am joining in the Lawnscaping challenge once again.  The current challenge #98 is to create a background

I used the first Lawn Fawn stamp set I owned for the sentiment, and another favorite for the background.  I heat embossed in white the sunflowers on watercolor paper, then I added in color.  Once the panel was dry I trimmed it to fit an A2 card base.

For the sentiment, I cut a notebook paper shape, and added the sentiment, inked it with some distress ink and then embellished it with another sunflower and two leaves.  I added glossy accents and Wink of Stella to the embellishing flower and leaves.


You can click on the link above or the graphic below to be taken to the Lawnscaping challenge.

http://lawnscaping.blogspot.com/2015/01/lawnscaping-challenge-create-background_19.html


Thanks for stopping by!

Supplies:
Water Color Paper - Canson
Water colors - Koi
Inks - Versamark, Hero Arts Cup O Joe, Distress Ink Wild Honey, Wink of Stella Clear
Stamps - Lawn Fawn - Hello Friend, Our Friendship Grows
Die - PTI - Spiral Notebook Page
Cardstock - Stampin Up - Whisper White, So Saffron
Glossy Accents, Stampin Up Dimensionals

Two more for the Stash


Hi!  It was snowing here in Maryland while I made cards, so I decided to work on the Christmas card challenges that I am participating in.  And as luck would have it one card also was inspired by a third challenge.

So here we go, first up is my card with the layout design is inspired by Muse #101's card by Marion Vagg.  I stamped and embossed my sentiment, then masked off the top and bottom so I could randomly stamp snowflakes - the optional twist for One Layer Christmas Cards.  Each snowflake was heat embossed and then flakes which showed their centers got a rhinestone. I rounded only the top corners for my card.


Supplies:
Cardstock - Simon Says Stamp
Stamps - Hero Arts Swirl Christmas
Embossing powders - Stampendous Winter Wonderland, Hero Arts - Silver
Rhinestones - Stampin Up


Next up, I made a card for Merry Monday #142 House(s).

I love teal and red together.  I scrambled through my stamps and found a house.  I first die cut my tag, then stamped it, then dry embossed it.  There was no hole in the die cut tag so I used a small round punch.  I added ribbon, twine and  a  Merry die cut before adding red Wink of Stella to the door and light bulbs.  I put down a very pale shake of pink on the house front so it wasn't just a bunch of white. Then I popped it up with foam tape on a teal and white dotted card base.

Supplies:
Cardstock - Stampin Up Whisper White,  A Muse Petite Dotted, a scrap of red
Ink - Memento Tuxedo Black, Red Wink of Stella
Colored Pencils - Artist's Loft
Embossing Folder - Provo Craft Swiss Dots
Stamp - Hero Arts Wishes Come True
Die - Simon Says Stamp Merry Christmas, Pretty Pink Posh - Stitched Duo 3
Ribbon - A Muse , Twine - Lawn Fawn


Thanks for stopping by.  Click on the picture to go to the challenge!


Muse #101, Marion Vagg

One Layer Christmas Card Challenge


Merry Monday Challege #142


Wednesday, January 21, 2015

His and Hers

A while back I took and participated in an Online Card Class - His and Hers.  I needed two get well type cards one for a gal with a bad cold and one for a guy recovering from emergency surgery.

I am glad I took the class, I remembered how easy it is to make two cards one masculine and one feminine by just tweaking a couple of things.  So, I used the same card layout, the same stamp set and altered my colors,  patterned papers and sentiment font.

I needed to create a focal area for the tiny image and sentiment I used, so I was happy to rip open a package of a new to me die from PTI.  I used it to die cut a panel to create a stamped and inked background for my little nurse and sentiment. 

Feminine Version

Masculine Version
Which one do you like better?

 Thanks for stopping by.

Supplies
Shared by both:
Bo Bunny Paper from the 6x6 pad Altitude
Stamps - Lawn Fawn Get well Soon
Die - PTI Spiral Notebook Page
Inks- Simon Says Stamp Lipstick Red, Ranger Black Archival
Artist's Loft Colored Pencils
Inky Antic's Gamsol
Bazzill Cardstock
Feminine Only-
Inks- Simon Says Stamp White Pigment, Hero Arts Soft Pool, Distress Soft Pool
Stamps- Friendship Grows

Masculine Only -
Inks - Versafine Onyx Black, Distress Frayed Burlap, Hero Arts Soft Sand

Tuesday, January 20, 2015

A guy thing...

Guy cards...so tough to make.  I have a few things I want to send to my Dad, and he loves getting my cards.  I so love this stamp set from Simon Says Stamp, and now that they have released a coordinating die...more cards are coming!


I am entering this in the Simon Says Stamp Wednesday Challenge, It's a Guy thing.

Thanks for stopping by!

Supplies:
Cardstock - Stampin Up, Patterned Paper - Kaiser Craft
Inks - Simon Says Stamp -Dark Chocolate, Hero Arts - Cup O Joe and Soft Sand
Die - Simon Says Stamp - Sending
Stamps - Simon Says Stamp - Sending Happy Thoughts
miscellaneous wood veneer pieces

Saturday, January 17, 2015

Freshly Made Sketches #169


I have been making quite a few get well cards lately. Here is the latest card.  I used the sketch from Freshly Made Sketches #169. I took a bit of license with it to fit my sentiment.

 I took advantage of using some patterned paper and a very simple botanical stamp to give this card a masculine feel.

Thanks for stopping by!

Supplies:
Cardstock - Stampin Up - Very Vanilla; Patterned Paper - left over from a SSS card kit
Stamps - Paper Smooches - Botanicals 2; Simon Says Stamp -More Sketchy Banners
Dies - My Favorite Things - Pierced Rectangle Stax; Simon Says Stamp - Sketch Banners

Ink - Versamark; Hero Arts - Field Greens
White Embossing Powder, cream enamel dot

Friday, January 16, 2015

What's New Pussycat?

Another late night card making session.  I wanted to get a card in for the Muse Challenge #100, and before it is too late and Monday is here again, I decided to make one tonight...or this morning...if I haven't been to bed yet, it is still night regardless of the technicality of the actual clock and calendar.


Above is our Muse card from Michele Ferguson, in addition to her lovely card, she has used a song as inspiration. 

I have decided  to use a song as well...


I took inspiration from Michele's cut out and smaller interior piece for my card. 

I cut the tag, then cut out the sentiment bubble on the back side so its pointing in the right direction.  Then I went to my computer and typed out the sentiment. I printed it on printer paper first. I used the tag to assure placement of the sentiment by centering the sentiment in the middle of the opening, then taping down the die cut piece over the open space on top of the printed sentiment. Once this was done I reprinted the sentiment on the same sheet of paper - this time it printed onto the die cut.

I masked off my kitty, and inked up the tag face. Then I colored the kitty with colored pencils and gamsol.
The tag is attached with foam tape, and I placed the sentiment bubble flat on to the card base inside the cutout.

I think this card will brighten up my niece's day in the middle of a cold wet winter.

Thanks for stopping by!

Supplies:
Cardstock - Strathmore Bristol, A Muse Cardstock
Colored Pencils - Artist's Loft (and Inky Antic's Gamsol)
Ink - Distress Inks - Mowed Lawn and Salty Ocean,Memento - Tuxedo Black
Stamps - Newton's Nook - Newton's Antics
Dies - Lawn Fawn Stitched Party Banners, Hero Arts Phrase Bubble


Hope it was a surprise!

Last November, as I was going through blogs, I saw a Christmas card that I absolutely loved, and I unabashedly suggested in the comments, that the card should be sent to me.  Well, Leslie did just that!  The card arrived during my 3 weeks in California, and I did not realize it had arrived so I couldn't send a card back to her for the holidays.  I am surprising her with this card instead. 


Another late night crafting session for me, I was playing poker with my Dad online until Midnight.  I put some of my favorite elements on this card, embossing paste, heat embossing, layers, ribbon and a stacked die cut.

Thanks for stopping by!

Supplies:
Die - Simon Say Stamp - Sending
Ribbon - Ellen Hutson
Dots - no clue
Stencil - Simon Says Stamp - Zig Zag Dots
Stamp - Simon Says Stamp - Sending Happy Thoughts
Paper - DCWV Shimmer
Cardstock - Stampin Up
Ink - (to color embossing paste)-Majestic Blue Versafine, Versamark
White embossing powder

Card Concept Anniversary


I have played a few times over at the card concept.  I recently saw it was their one year anniversary and the inspiration photo inspired me to play along.

Those pink carnations and roses along with the pure white of the baby's breath just grabbed my attention.  I also spied that bit of soft blue coming out of the pink box, and of course the ribbon around the package.

I made a clean and layered card for my entry to this challenge.


I pulled out a few older Stampin Up stamp sets and some ink pads and set to work. I stamped the flowers and punched them out.  Next came the greenery stem.  Then the panel was die cut. The inner portion was wrapped with a blue chevron ribbon and a bow.  The flower centers are pearls.


  Thanks for stopping by to take a look!

Supplies:
Stamps - All Stampin Up - Curly Cute, Fabulous Florets, Petite Petals
Ink - Memento-Angel Pink, Simon Says Stamp-Green Leaf
Ribbon - May Arts
Die - Simon Says Stamp - Frames

Thursday, January 15, 2015

Sending Thanks

It's the time of year for thank you cards.  I haven't played with my watercolors lately, and I wanted to make something for the Virginia's View Challenge #11.
January's Theme: Clean Slate
The theme this month is clean slate...I won't lie...white space makes me itch.  So these cards are particularly tough for me.  But I decided to tackle it anyway.


Thanks for stopping by!

Supplies
Die - Simon Says Stamp Thanks
Stamps - Simon Says Stamp Sending and Wishing
Watercolors - Koi
Ink - Versa Fine Majestic Blue
Paper - DCWV
Dots - MME

Wednesday, January 14, 2015

Wishing...

I made this card specifically for the Simon Says Stamp Flickr group challenge #10 - Dots N Spots.  I was used several Simon Says Stamp branded products, and I love how the card turned out.

I added some distress ink to embossing paste, and applied it to a card panel 3/4 of the way up the card.
While that was drawing, I inked some paper with the matching color and die cut  a sentiment strip and word.

I stamped and embossed in white a sentiment on the strip.  The die word was double stacked and covered with glossy accents. To add just a bit more pop on this monochromatic card, I added some sequins. The finished panel was trimmed a bit and popped up on a matching card base.


Thanks for stopping by!

Supplies:
Stencil - Simon Says Stamp - Zig Zag Dots
Stamp - Simon Says Stamp - Sending and Wishing
Dies - Simon Says Stamp - Wishing, Sketchy Banners
Ink - Distress Ink - Tumbled Glass
Sequins - Pretty Pink Posh

One Layer

Another new to me challenge is the One Layer Christmas Card Challenge. It runs bi-weekly and this is the first one of the new year. The theme is anything goes, with an optional twist of using red; the challenge runs to the 19th of January.


One layers cards are tough for me, but I thought I would give it a go.  I so loved this Lawn Fawn stamp set that I picked up during my fall trip to visit my Dad. I didn't play with it nearly enough during my Christmas Card making frenzy in November.

My images were colored with pencils and blended with gamsol. I added a bit of red WOS to my cardinal- my very favorite bird. The background was sponged and I did some masking as well. I just love that font!

Thanks for stopping by!

Supplies:
Stamps - Lawn Fawn - Joy to the woods
Inks- Memento Tuxedo Black, Simon Says Stamp - Lipstick Red,  Distress Ink - Stormy Sky
Aritist's Loft Pencils & Inky Antic's Gamsol
Red Wink of Stella


Monday, January 12, 2015

Getting a Head Start

I was so impressed with people playing in Christmas Card challenges that run year round, last year.  I wanted to join in but felt I had stumbled on the challenges too late for my way of doing things.  I like order, I don't always achieve it but, I do like it.  So with the new year, I am going to give it a try.

My first play along is with Merry Monday #141 Christmas Critters.  I picked up a few Lawn Fawn stamps duirng my fall visit to California and the critters...well they are so cute. 


I die cut this little penguin out of white paper, then 4 times more out of black paper.  I stamped him and colored him on the white paper using black ink and colored pencils to which I applied gamsol for blending. 
I wanted the little guy to really stand out, and I love giving heft to diecut words, and decided to try the same stacking technique with the penguin. To embellish him I added red and black WOS.  I love how it turned out. 

I stamped small snowflakes, and the sentiment.  Drew in a little ice patch to ground the penguin and added a festive red ribbon and bow to the card front.  After looking at the card I decided the opening corners of the card needed to be rounded.  This little guy makes me smile and I am sure his recipient next year will too.

Thanks for stopping by!

Supplies
Stamps- Lawn Fawn Winter Penguin
Inks- Memento Tuxedo Black, Simon Says Stamp Lipstick Red, Hero Arts Silver
Ribbon - Michaels
Glitz - Wink of Stella (Black and Red)
Pencils - Artist's Loft,  Gamsol from Inky Antics

Sunday, January 11, 2015

100th Scramble

I knew I had a Hero Arts Scramble to participate in on Saturday.  I for some reason had 2 pm stuck in my head.  I slept in, and awoke around 12:30.  Before breakfasting, I decided to double check the time of the scramble, and YIKES it had started at noon.  By this time it was 12:39 - I checked the clock to see if I would have enough time to get a card put together!  After reading Barb's theme - using our favorite Hero Arts Stamp and favorite Hero Arts Sentiment...I thought I could pull something together.

Thankfully, I had some pre cut and folded card bases. I grabbed one and some vellum, some ink, some white embossing powder and three of my favorite Hero Arts stamps.


The card base was first stamped with the large background stamp.  Then the vellum was stamped with the flowers and heat embossed and then the same with the sentiment.  I masked off the portion where the sentiment was placed.

I attached the vellum to the card front with some multi matte medium under the more solid portions of the flowers.  I also added a bit to the top, and wrapped some pink hemp cord around it.  Sequins in two shades of pink were added to some of the larger flowers for a bit of glitz.

Thanks so much for stopping by!  Check out the scramble schedule and join in!

Supplies:
Cardstock - Simon Says Stamp
Ink - Hero Arts Bubble Gum, Versa Mark
Stamps - All Hero Arts - CG516 Numbers Pattern, CG525 Tall Flowers, CL738 Messages with Flourish
White embossing powder
Hemptique pink cord
Sequins - Darice (bag of assorted colors)


Friday, January 9, 2015

Two Challenges...No Make it Three (ETA)


Another post today, I am getting back into the card making groove. Our Muse this week is Vicky Dutcher, I love that she used red, white and black. Those were my wedding colors.

I sent hubs a few cards while I was in California after he returned to Maryland, and this Muse is a great inspiration to send him another card. Yes, I am back home - but now and again I send him a card to his business P.O. Box as a little surprise.


I was inspired by the colors and the circular shapes on Vicki's card and the sequins bits.

I went with a round card and used several round dies some with stitching, a heart die, and love you dies.
I first cut my circle card from a large circle, then I cut another out of white card as a backer for the pieces I was creating.   I laid out my dies all the way to the center heart, taped them together and cut them from the front of my card and a piece of white cardstock simultaneously to make sure they would all fit together. I used a metal shim and it easily let me cut through two pieces of cardstock at once.

Next I cut several layers of love and you on black cardstock, they were layered up and brushed with my new black wink of stella.

Once I had all the pieces, I glued everything into place and added a few pieces of sequins. I didn't like the little holes showing the color through, so I dabbed a black brush tip marker through to the paper making the sequins appear to be solid.

I am submitting this to Muse#99, and the Diva's that cut paper January challenge - anything goes.


ETA - A new to me challenge Color Throwdown has Red, White and Black for Challenge #324, I am adding this one to the gallery.

Thanks so much for stopping by!

Supplies:
Cardstock - Stampin Up, Neenah
Sequins - Darice
Dies - Spellbinders Grand Circles, MFT Stitched Circle Stax, Lawn Fawn - Stitched Party Banners, SSS - Love You
Metal Shim - Memory Box