Saturday, May 31, 2014

Scramble 85

I set my alarm so that I could play in today's scramble over at the Hero Art's Flickr group.  Hubs and I are night owls and rarely are asleep before 3 am, I blame it on having lived 40 years in the Pacific Time zone, and not being able to adjust to Eastern Time.

Jayne hosted today's scramble at 11 am and she gave us the following prompts:

1. ONE OR MORE WHITE FLOWERS
2. SCRIPT (or cursive) style SENTIMENT
3. USING THIS PHOTO for inspiration.

Inspiration Photo Scramble 85 by paperpicnic (Jayne)


Having recently gotten up I needed to make a fairly simple card.  I chose to use Hero Arts CL CL750 Butterfly and Flowers set using the flower outline, and my sentiment came from Hero Arts CL738 Message with Flourish.  My inspiration came from the lower left quadrant, I thought my embossing folder was of a similar pattern. 

My card is a split panel, with the upper layer dry embossed for texture, 3 white embossed flowers on vellum, transitioning to a blue panel with a white embossed sentiment.  I used the dotted ribbon to facilitate the transition from white to blue.
Thanks for stopping by and I hope you have a wonderful weekend.


Friday, May 30, 2014

More Night and Day Flower

I made a set of cards from the stamp I am currently obsessed with - Hero Arts Night and Day Flower, and I am still only playing with the outline image, it also has a solid image. The sentiment is another Hero Arts stamp from Everyday Sayings...this one too experienced a little cut to make it fit.

  Distress Markers and Ink pads in Peacock Feathers, Salty Ocean, Wild Honey, and Dried Marigold
 Distress Markers and Ink pads in  Milled Lavendar, Shaded Lilac, Mustard Seed and Spiced Marmalade
Distress Markers and Ink pads in Worn Lipstic, Tattered Rose, Broken China and Tumbled Glass
Distress Markers and Ink pads in Spiced Marmalade, Ripe Persimmon and Peacock Feathers

I was at AC Moore and they have 30 sheet tablets of Canson Watercolor  9X12 cold press 140lb paper on sale for $5.88. I grabbed two considering my obsession with the watercoloring right now. I cut it into 4.5 by 6 inch sheets and intended to use it for practice, but it worked really well with the markers for blending colors.  Woot! It took the versamark well for heat embossing on the smooth side.  The color is very close to the distress watercolor paper as well.

I'll be wrapping this set up with some stamps and a pen for a birthday gift.  Thanks for stopping by.

Wednesday, May 28, 2014

Thinking of you

On hubs and my little day trip last week I picked up 4 stamp sets. I have had my eye on this Hero Arts set- CK779 Night and Day Flowers for a while and I am so glad it is part of my stash now.

I used some Distress Watercolor paper, Archival Black ink, Distress Markers, Wink of Stella markers, and some gold thread.  The sentiment, I cut apart to make it fit, is from the Hero Arts set Everyday Sayings CL342.

Tuesday, May 27, 2014

Still Loving the watercoloring

I cannot seem to get away from my watercolors.  I love this medium, and the dreamy quality of the cards. Hubs and I recently had a day trip and we stopped by a craft store in Great Mills MD, called The Creative Nook. I had three stamps in mind when I walked in and she had all three in stock as well as a die I had recently seen used.  So I walked out with all four.

For the first time, I got them home, inventoried, and used within the same week! WOOT!

This features the Penny Black stamp Delightful, sentiment stamp by Simon Says Stamp, Distress Watercolor paper and Distress Inks, gems are by Stampin Up.

I grabbed a couple of mini distress ink sets at Michaels a few weeks ago when they were 40% off your entire purchase.  These are so quick and easy to use on an acrylic block for painting. 

Thanks for stopping by!


Sunday, May 25, 2014

Celebrate Today

My BIL's birthday's is coming up, and I have the opportunity to get another man card under my belt.  I quite like how this one turned out.  The stamp sets both come from Stampin Up - By the Tide and Perfectly Penned. A few layers, some stamping, some fussy cutting, some burlap, twine, a sparkly brad--I couldn't help myself, it matched the theme! :-)

Thanks so much for stopping by!

Friday, May 23, 2014

Simple One Layer

I am still playing with my water colors, and made this quick simple card...I think the hand drawn frame fits perfectly with the flower image.  A stamp from Impression Obsession and WPLus9, Koi Watercolors, Versafine Ink were used.


Thanks for stopping by!

Wednesday, May 21, 2014

Scramble Modified

Barb G hosted a scramble over at the Hero Arts Flickr group, Saturday the 17th.  She gave us instructions to make a true one layer card. No additional layers from Washi Tape, Die cuts, Sequins, Gems, etc. We were allowed to use Glossy Accents, Enamel Accents (Ranger), Stickles, Wink of Stella, embossing powder, embossing paste and glitter.

I will admit this truly was a challenge for me.  I am a layers person, I love ribbons, gems, and dots.

So, I pulled out three stamps, an image Butterfly from CL750(HA), a sentiment Time to Enjoy F1843(HA) and the dotted path from Circle Friends SSS101309(SSS).

I had a prefolded note card, and I stamped my sentiment...crooked...arrghhhhh.  I turned the card over and restamped the sentiment with a stamp positioner. Good...then the butterfly with the positioner...it did not stamp well and restamping even with the postioner...yuck!  So, I turned the note card over again...

This time I started with the butterfly, then the path, and then the sentiment. Hooray...no smudges or light spots. The butterfly I colored with Distress Markers:  Salty Ocean, Broken China, Tumbled Glass, Squeezed Lemonade, Mustard Seed, and Spiced Marmalade. I added some black dots with a micron pen and then lightly washed a bit of wink of stella over the orange parts.  When all was dry, I put the card on my scoring board and added a few score lines to give some texture.

I love how the card turned out...but it could not be sent to anyone with two messy panels.  SO my only choice was to cut it up and paste it onto another card base.

I couldn't leave it as it was, after all the scramble was over and it was posted...so I added some color and some dots with my yellow wink of stella pen.

These things could have been done and still maintained a one layer card, had I inked the card edges...but 90 minutes goes by so fast when you are scrambling...and  I literally did have to scramble with my sloppy stamping.

Thanks for stopping by!

Sunday, May 18, 2014

Water Color Play Day

http://onlinecardclasses.com/watercolor/wp-content/uploads/2014/04/WC_participant.pngFriday was a "play day" over at Watercolor for Card Makers, and I started out with one of the techniques shown by Mr. Tim Holtz, but then went off on a tangent...not a bad tangent .

The technique was mono printing. Taking various mini distress ink pads and inking up a stencil, then spritzing it with water and smooshing it into a piece of watercolor paper.  The open spaces should be highlighted.

I think I did not use enough ink on the rays stencil, so I did it again over the top.  Still not happy with the result, I sprayed the entire surface with water.  No image, but boy did I love the background of mustard seed and dried marigold I ended up getting, one can almost see the rays if you squint just right.  So on to plan B.

My second favorite class, was the Stencil class and I was itching to use some embossing paste again.  My panel was not 100% dry, so the white embossing paste picked up some color.  I used another TH Stencil, Bubbles for the dots,  just placed the embossing paste on opposite corner areas of the card and left it to dry... no really, I left it alone...no glitter, no heat gun.

I went on to try another technique, coloring on vellum. I stamped my image in black, then on the backside used derwernt inktense pencils to color the image.  I used a bit of water to spread it about, as my blender pen had dried up! Water gives vellum an interesting texture.  It was all warpy...but I was going to make this work.  I fussy cut the image and embraced the non flat structure of the sunflower.  I mounted it on to the front of my watercolor piece with clear foam and then added an edge punched strip and some gold thread and a feel better sentiment from the same Lawn Fawn stamp set as the flower. All was adhered to a card base to complete the card.

It was so much fun playing and I love where my piece ended up.  This one probably won't go into my notebook except as a photograph...it really needs to be mailed to someone who needs cheering up.

Thanks for stopping by, and have a play date!

Thursday, May 15, 2014

Day 10 of Watercolor for Card Makers

My second post today.  More free hand paining...yikes.  Well there is one thing that I feel almost comfortable painting free hand and one thing only. A sunflower.  I have one on my craft room wall that I painted with acrylic paints years ago. Again this took a while just to paint, much less dry, mat and add a sentiment; but, it was a peaceful afternoon well spent listening to some soft rock and the light rain outside.


I had the sentiment in mind when I sat down to paint, it is from Simon Says Stamp Color and Sunshine stamp set.  So while normally I would have the "white space" above the flower...in a play on the sentiment, I inverted the image panel.  Simon Says Stamp Sunshine card stock is the perfect card base for this piece as well.

http://onlinecardclasses.com/watercolor/wp-content/uploads/2014/04/WC_participant.pngI so loved this class, I know part of it is the medium of the water colors. However, I have to say the class materials - Video (every single class day) were spectacular. So much talent in the group of instructors and guest designers. This class is so worth taking. The galleries and forums remain open to additions until May 22th. 


Thanks for stopping by.

Day 9 of Watercolor for card makers

http://onlinecardclasses.com/watercolor/wp-content/uploads/2014/04/WC_participant.pngLesson's 9 and 10 the freehand watercoloring is the biggest and toughest hurdle for me.  It plays right into my horrid little I Can't draw mind set.  I also have an I Can't sing mindset (verified by anyone who has ever ridden in a car with me while I sang along to the music). I am not hard on myself, just realistic about my ability to freehand images. That being said and while I admit I really did not want to try the homework...I sucked it up and did it.


Kristina Werner's freehand packages did not seem terribly difficult...but oh my gosh it took me literally hours to finish this one. I don't like to draw...I know practice will make it better...remember my lack of patience? It is at war with that theory. I added a banner to enhance the party feel.


Next up, a splatter tree.  I do not know how Jennifer Rzasa got such a nicely round tree in her example...I feel like I splattered everything in sight.

These two are so out of my comfort zone...and there is one more day of this topic.  Yikes!  Actually I have to say this has been my most favorite of the Online Card Classes.  I have taken 9 or 10 over the past couple of years. I love that you have lifetime access to the class content, and I even put together binders of the lessons and my card samples. I do refer to them after the class is long over.

Thanks for stopping by!


Wednesday, May 14, 2014

WC4CM Days 7 and 8

http://onlinecardclasses.com/watercolor/wp-content/uploads/2014/04/WC_participant.pngDay 7...it was a tough one for me. Not sure why, but I struggled.  Though I can say that this morning my pieces don't look as  bad to me as they did last night, so I am posting them.

Day 8 was easier, I loved the using the stencil I had cut a while back using Simon Says Stamp's Viola die.

So on to the pictures


My two day 7 samples, I was unhappy with the foliage, but after they dried, it all kinda blended in and its fine. I guess it is true, you have to wait for it to dry before making any drastic decisions like tossing wet paper into the round bin.  I will have to say this technique is an exercise in patience, which I do not possess in any reasonable quantity.

This one was fun, I loved how it turned out.   All three pieces are small, 3x3 on the actual watercolor piece. They are going into my notebook with the daily lessons. Though I can definitely see this one being replicated.

Thanks for stopping by, only 2 more days of class then on to the mountain of other cards on my to do list.


Sunday, May 11, 2014

Two more Day 5 and 6

Here are my two latest homework pieces for the amazing class over at Online Card Classes.
http://onlinecardclasses.com/watercolor/wp-content/uploads/2014/04/WC_participant.png
Onlinecardclasses.com

 Both for the topic of water coloring stamped images. One is a background piece selectively embossed then colored in a fading fashion and the other is an image which used Luminart Shimmer Mist as my "water".

I was kinda stuck for a background stamp for the Shari Carroll inspired card, then tried this stamp from Hero Arts, it is called Magical Background.  I think those swirls when colored almost look like simplistic roses.  I am quite happy with how it turned out.

Then next image was based on Jennifer McGuire's white embossed floral image and circle die cut. I am not sure I like the free hand cut of the circle, next time I think I would lay down the circle die, mark where it intersects with the flower and leaves, then cut in on those and pull them over the top of the circle and die cut the rest of it, so that is is better proportioned.  Or maybe even a different shape, a square maybe...with that hydrangea's big blooming head, some straight lines might be good.

Still one week to go in this class which is by far one of my most favorites...this one and the stenciling class, hard to decide which one gets top billing...for now it is a tie.  Thanks for stopping by!

Happy Mother's Day

I lost my Mother in 2006, and I still miss her every day.  I am however blessed with the nicest MIL that there could ever be. We became pen pals while I was dating her son and quickly developed a wonderful friendship. This is her card.
It took me almost 2 hours just to get that water color panel right...mostly because of the sentiment stamping. It kept getting messed up. It was frustrating to have that perfect blend of yellow orange and red to make this lovely coral-y pink shade and then ruin it with gloppy stamping.

I finally decided to stamp the sentiment on vellum. The flowers are die cut violas from Simon Says Stamp, they of course are covered with rock candy distress glitter, and have stampin up gems in their centers. The watercolor portion was die cut with the deckled edge rectangle spellbinder die... perfect for that watercolor feel.

Saturday, May 10, 2014

Continuing Watercolor Journey

http://onlinecardclasses.com/watercolor/wp-content/uploads/2014/04/WC_participant.png
onlinecardclass.com


I am enjoying this class so much, and today I probably made one of my all time favorite cards.  I have two to share, one was from day 4 - watercolor with stamps.  I really need another watercolor type stamp image to get a better product, but this will do.  I wanted to bring out that yellow center, but I am thinking it would look better without the string. Next time...


Today, day 5 I watched an amazing artist at work with watercolors and a stamp. Swarup Murthy made such an incredible water color card using a stamp, watercolors(cake) and some distress ink pads. It was amazing to watch her work and for her images to take shape.  Her blog is here.

It was way out of  my comfort zone, but I had to give it a shot, and eventually I surprised myself. 

Finding the right image took some time...I tossed away 4 other attempts before actually going with this one and finishing it all the way. And it took time...I am so impatient, that I am surprised I stuck it out. I used crayola (cake type) watercolors, and some tube type watercolors to get a nice deep yellow, and some distress ink for the stamp image and sentiment. I will have to revisit this technique. I love this little bit of a card about 3.75 by 3.75 inches.  The photograph does it no justice at all.
The class still runs another week.  If you have ever thought about watercolors and moved mentally on because you do not feel "artistic" think again.  I am in awe of people who can see something in their head and actually translate it to paper.  I do not have that talent at all.  This class makes me feel "artistic".

Thanks for stopping by.

Thursday, May 8, 2014

More Watercoloring

I am still loving this class, and here are my pieces for day 2 - more backgrounds and day 3 stamping with watercolors.

The no line background created with color pencils was amazing to watch.  I think I got the effect down. I did go a bit crazy with the gold thread! The color wash is very subtle, hard to photograph, pinks fading to pale yellow on the top and bottom. The piece is matted on gold edged card.


I had so much trouble with this next technique, this is attempt #5...I love the look Jennifer McGuire was able to capture, and I got close, but in doing so I tossed a lot of attempts.  I don't even want to save them for die cuts.


Next up was some stamping to mimic water coloring in Day 3. I may have to give this one another go, but I do so love the colors in this one. I painted in the stems and leaves... This was part of a two step stamp set and the flowers were put on individually and in different places than the stem stamp hence the need for the hand drawn stems.


I just have to say Kristina Werner is amazing, her sample was so beautiful, I want to buy the stamp set...but could I pull it off???? That's the big question.  Will have to mull that one over for a while.  Have a wonderful day.  I am going to be cleaning windows today, it is finally warm and dry enough to get it done. Thanks for stopping by.

Monday, May 5, 2014

Watercolor Class

I am not sure why I hemmed and hawed about taking this class at Online Card Classes. I have dabbled in a few water color cards and enjoyed them, but was having a hard time mustering enthusiasm for the class. I kept hoping to win a seat to make my decision easier.
http://onlinecardclasses.com/watercolor/wp-content/uploads/2014/04/WC_participant.png
Late last night or was it early this morning, I took a look at my watercolor supplies...trying to decide if I wanted to take the class.  Obviously I had enough "stuff" to probably be able to mimic most of the techniques.
So I decided to sign up.   As I looked around the site, wow...preclass videos...and suggestions to actually play with your "stuff" to get used to how it works.  GENIOUS SUGGESTION LADIES!  So at around 2 am I started to play with my stuff, I made swatch cards and a plaid background.  I did learn an important lesson...the watercolor paper should be of a better quality. I had some cheap stuff I had cut up for practice and used it for the swatches, and I could really tell when I used my distress markers.  It did not blend well at all. So for about 2 hours I played while most people were tucked in and sleeping away. My swatches:

I went to bed at least curious and less ambivalent than I had been about this class.  This morning I had an online poker tournament to host and some housework to do before being able to attend class.

I am no longer ambivalent, I am IN TOTAL LOVE with this class.  I love the videos, and even more I loved playing and making my cards.  This was not HOMEWORK, this was so much fun.  My cards are my first efforts, and one of them could definitely use some refinement, but they go into my binder and are for me.

I can promise however, that watercoloring will definitely be a go to for card making.  My favorite of the three is the small thank you card with the oversized sentiment.  I will definitely be making card sets similar to this for gifts!

And finally, here are my cards from today's lessons.  I pretty much cased the designs, and used what I had on hand for stamps and dies.

watercolor with stencil laid upon it
 I wanted to mimic the diagonal strips in the card base, and embossed the tag. I probably would leave that off next time and get a stencil with smaller openings so the pattern will pool better.
watercolor with large sentiment die cut
 I so love this one.  The class card had the watercoloring on a panel which was placed on a card base along with its already white border.  I was a little uneven and messy with my color placement, so I die cut the panel with a deckle edged spellbinders rectangle. This is a small card only about 4 x 2.75 inches.
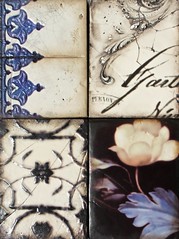
watercolor and resist embossing
Vellum is not forgiving at all. I was trying for a Beatles vibe here.

I used an 8 pack of crayola watercolors for the first and third cards, distress inks for the middle card. Embossing powders were from Hero Arts, Versamark Ink.  My blue ink on the first card is Hero Arts Neon Blue, the gold is Delicata. The thank you die is Hero Arts, the love die is Simon Says stamp. The heart brads are from Peebles. Embossing folder is from Sizzix and the twine I found at Target years ago.

Thanks for stopping by and getting through this long post.

Saturday, May 3, 2014

A different Scramble

Today I hosted a scramble over at the Hero Arts Flickr group.  I set up the theme, and watched the clock.  I made three sample cards for my theme.  I decided to go with 3 elements, participants needed to pick one element from each column to create their card.

Here are my sample cards:
A Hero Arts Sillouhette Die Cut Image (14337) with Hero Arts ribbon on a watercolor panel

A Hero Arts Tweed Pattern Stencil SA002 with white embossing paste, white heat embossed greeting (CL380) and some pearls.
Hero Arts 657773 Butterflies stamped and die cut, placed on a die cut inked panel with brads in the centers. Sentiment stamp also Hero Arts CL730. (The butterflies were stamped and cut from the same panel as the circle to keep the colors consistent.)

You can check out the other creations at this link. Thanks so much for stopping by!