Tuesday, March 31, 2015

March Card Chain Challenge

Have you participated in a card chain challenge yet?  Try it. The sign ups for April are ongoing right now at this link.

I decided to go with the theme of Easter this time.  I gathered my supplies - a new Easter word die from Simon Says Stamp, a sentiment also from SSS, some enamel dots, a Stampin Up tulip stamp, my distress markers, Stampin UP card stock and a piece of Bristol paper.


I stamped and colored my image using the distress markers, a fine tipped brush and a small bit of water. I wanted the colors to be stronger rather than pale. After I colored the tulips, I colored the die in a gradient of worn lipstick. Wink of  Stella was added to the die and the tulips.  I added some random pale pink enamel dots, because too much white space makes me itch.  My main panel was mounted on a SU Regal Rose card base.

Thanks for stopping by.

Happy Anniversary

I needed an anniversary card, and Newton's Nook has another inky paws challenge.  I used their watercolor prompt as inspiration, and am entering this card to the challenge. The challenge is open until Friday, April 10th, 2015 at Midnight CST.

Inky Paws Challenge #19 - Watercolor 

Basket of Wishes and Simply Sentimental are the two Newton's stamp sets used to make this adorable 4bar card.  I first heat embossed in gold, then water colored the images.    A bit of clear glitter atop the glasses, and some very small sequins as well provide the embellishments.


I also had an ah-ha moment.  Versamark ink is very sticky and I first stamped my "anniversary" sentiment portion above the flourish...and it was badly stamped by me.  I brushed off the embossing powder and found a new position for the sentiment below.  Once the card was done (I spent time embossing and water coloring....I wasn't tossing it out!)  I found that I could erase with a white eraser the versamark residue on the paper.  YEA! I did not know that was possible previously.  I don't know if it works as well on colored cardstock...but it does on white.

Thanks for stopping by!

Saturday, March 28, 2015

I have finally finished

my homework for the recently ended Online Card Classes course Stretch Your Dies.  I learned some new things and remembered some forgotten things.  As usual I enjoyed the class immensely. And as the class has closed I can post all three cards in one post. No linking issues to the class gallery.

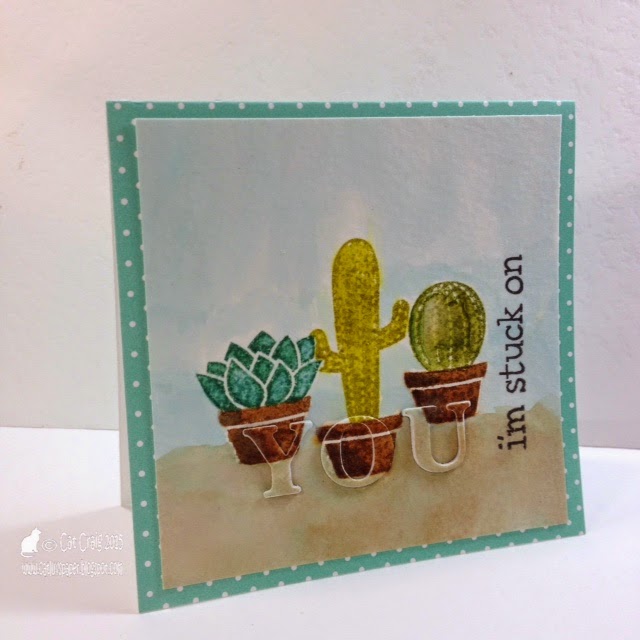
So on to the cards which all use Alphabet dies, the topic for our last lesson.  My dies came from Memory Box and My Favorite things.  Stamps were from Lawn Fawn, Hero Arts, Stampendous and Simon Says Stamp. I used distress inks for color, versa mark for embossing and some Lawn Fawn and Hero Arts.


This technique used freezer paper to iron on letters to water color paper. Gave very clean masking. I actually used the barrel of a curling iron to melt the plastic to the watercolor paper.

Shaker cards with tiny spaces...are time consuming. Getting all that two sided tape down in the right places, and I used two layers of fun foam - it seemed to lessen the static jumping of beads, glitter and micro beads out of the channels and on to freshly laid glue tape.

These were fun stamps, they are solids...so I used distress inks, and then moved color around with a tiny brush once they were stamped onto watercolor paper. Looks almost like a no line colored piece.  The raised YOU  is subtle.

It has been a busy week, and my Easter cards are still not made...I'll be grinding them out on Sunday afternoon. I hope to mail them Monday.  Thanks so much for stopping by.

Wednesday, March 25, 2015

Day 6 card 3

Border dies were used to make a shaped card.  I was trying to create a feeling of a wave.


Thanks for stopping by!

Supplies - Stamps - Technique Tuesday, Dies - WPlus9, Lawn Fawn, Inks - Distress

Day 6, card two

Die was used to make a mask for inking the stripes a la Laura Bassen.

Thanks for stopping by!
Inks - Distress, Dies - Lawn Fawn, Simon Says Stamp, WPlus9, Sequins - Simon Says Stamp

Almost to the home stretch

Day 6...border dies.


Thanks for stopping by.

Supplies: Lawn Fawns Eggstra Special Easter, Colored cardstock, Pretty Pink Posh die

Tuesday, March 24, 2015

Day 5 card 3

Die cut window and white ink were the lesson here...this was a tough one for me.


Thanks for stopping!

Supplies: Staz On Cotton white, pp from SSS March card Kit, Hero Arts stamps, and A Muse dotted card.

Day 5 card 2

Cute is so not my style or comfort zone...but I do love that Mama Elephant kitty cat.  Dies were used to deboss.

Thanks for stopping by!

Inks - Hero Arts
Markers - Copic
Papers - Stampin UP
Ribbon and Bling -- scraps

Day 5...

Ready for three more of my homework cards?  Our lesson for day 5 was Coordinating Dies for stamp sets.  I cheated for this card.  I have the Pretty Peonies stamp set...but not the dies.  So, I flipped the stamps over and outlined them on the back side of masking paper - so when the masking paper was removed, the shape left would accommodate the stamped image in the white space. I also did not have a copic airbrush system, so I just used a dye in and a blending tool and did a lot of pouncing.  The masking paper did let a few ink spots seep through -- but I've decided to call it art! :-)


Thanks for stopping by!

Sunday, March 22, 2015

Day 4 - Card 3


Papers: Dear Lizzy - Lucky Charm & Stampin UP; Die -Lawn Fawn &Simon Says Stamp, Platinum EP, Sentiment - Clearly Besotted,

Card 2 - Day 4


Supplies:
Elizabeth Crafts - Dies, Stampin Up- Sentiment, Distress Inks - Mustard Seed, Wild Honey, Worn Lipstick, Picked Raspberry, Dusty Concord; Unknown enamel dots, White EP, SU Vellum.

More Homework...

Day 4 of Stretch Your Dies, so far has taken me the longest to complete cards in the spirit of each of the lessons.  In the past I have only made the card that appealed most to me.  This go round, I am attempting a card of each example, hence the multiple blog posts. I hope to be caught up by Wednesday the 25th.

Card 1 : (which is actually two cards, no pieces go to waste.)


I couldn't leave well enough alone, I embossed the card base of the piece showing the die cuts, and added flower centers via 4 mm sequins to the negative cuts version.

Supplies:
Darice - Basket Weave EF; Pretty Pink Posh Sequins; Clearly Besotted - Sentiment; Distress Inks - Dusty Concord, Milled Lavendar, Tattered Rose; White EP

Thursday, March 19, 2015

Day 3 3rd of 3 posts


Supplies: Big Thanks - Casual Fridays,  Lifestyle Crafts Dies, Smoky Gray Versafine Ink, Stampin Up Basic gray card base, A Muse Yellow mini dots paper

Day 3 2 of 3 Posts


I had not quite paid good attention to the lesson...I used too small a sheet for my Easter basket.  It should have been the top panel.  But I improvised and I think that inked oval die cut top panel really emphasizes the embossing from the fancy oval die.  Happy Ending.

Supplies: Prisma Color Pencils, Mineral Spirits for blending, Spell binder dies - Ovals, Floral Ovals, Lawn Fawn Eggstra Special Easter, Black Licorice Ink, Tumbled Glass Distress Ink

Day 3 1 of 3 posts

Day 3 took me a bit of time to wrap my head around. I had to sleep on it.
Today it didn't seem nearly as difficult.
Basic Shape Dies


 What a fun fold this was, and it came together much more easily than I expected.


Supplies:
Lawn Fawn - Eggstra Special Easter, Copic Marker, Prisma Color Pencils, Mineral Spirits for blending, A Muse small dotted paper, Simon Says Stamp - You

Wednesday, March 18, 2015

Day 2 3 of 3

Now I am caught up with the homework!


Supplies:
Spellbinder  Carnation Dies, SSS Sketchy Banner Die
Lawn Fawn Stamp Set

Day 2 card 2

This was my favorite technique of the day.


Supplies:
Dies - Lawn Fawn, PTI
Inks- Distress Inks

Day 2 Card 1 of 3

Today's lesson incorporated floral dies.


Supplies: Wow Silver Glitter embossing powder
Stamps - Clearly Bessotted
Die - Memory Box, MFT

Day 1 card 3

Inlaid Die Cutting.

This was tough to get lined up.

Supplies:
Paper scraps, SSS Thanks Die, Stamp Set- SSS Flower Friend

Tuesday, March 17, 2015

Day 1 Card 2

This card has a fun fold and uses the die cut letters to close it.  It is a matchbook sort of fold.


Supplies: MFT Highrise Alphabet Uppercase
               DCWV Glitter Paper
               A MUSE INKS  Blush, Berry, Grapefruit, Lichen
               MAMA ELEPHANT INKS Lollipop, Mojito
               STAMPS SSS-Flower Friend, You, ME-Basic Borders

Thanks for stopping by!

Ready for the blizzard

Not snow, spring I hope has sprung - today it was 73 degrees in Southern Maryland.  Yesterday I started another of my most favorite Online Card Classes - Stretch Your Dies.  I have to say 2 days into the class and the ideas are poppin'.

So the blizzard will be homework pictures...so far I have 6 in my head, and here is the first to actually make it to paper.  These cards are all about the die cuts.


Supplies:
Dies by MFT (Happy, Birthday)  Paper Smooches (Balloons)
Markers- Copic, Wink of Stella, 
Paper - A Muse Navy Mini Dots, Michaels White 110lb, and Fun Foam
Adhesive - PPA- Matte (Greta thanks for the heads up on this one), Xyron Sticker Maker - Made it easier to color the fun foam edges.

Thanks for stopping by!

Tropical

I've been contemplating all week what to do for CASology's challenge "Tropical".  I contemplated too long, the collection closed at noon, and I am about 12 hours too late.  I love the card, so I am posting it anyway.


Thanks so much for stopping by!

Supplies:
Distress Inks - Dried Marigold, Worn Lipstick, Picked Raspberry
Wink of Stella - Clear and Black
Glossy Accents
CK Nouveau Font

Monday, March 16, 2015

The Crooked Stamper Sketch Challenge 2

Yes, I am taking the latest Online card class, and no I have no homework completed on this first day of class. I have a couple of challenges that are blocking out all thought of stretching my dies.  So, on with the challenge cards!

This one is for my blogging friend Leslie's blog challenge - The Crooked Stamper Sketch Challenge, the second one.   I took two tiny liberties with her sketch....I put the oval on a diet, and fattened up the circle!

http://thecrookedstamper.blogspot.com/2015/03/cssc-2.html 

I used the A Muse stamp set nine lives for this card.  I thought the stretched out cat was perfect in an oval shape, and there was a matching sentiment that nicely fills out a circle.
 I cut the oval first, then stamped the cat inside using my stamp positioner. While still in the Spellbinders long oval die, I very lightly inked the interior with first Pine Needles then Tumbled Glass distress inks.  Next I stamped my sentiment and die cut it. It too was inked in the same manner as the oval, but with more pressure. I wanted it darker as a counter point to the oval. I chose some lovely Stampin Up DSP for the background, I love those stripes in contrast to the roundness of the oval and circle.  

Thankfully no one I know of is yet in need of this card...but it will be at the ready!

Thanks for stopping by, and check out Leslie's challenge - you can by clicking on the link above or on the challenge graphic.

It's all about the...

...sentiment and the embossing.

The challenge over at Virginia's View is All things Embossed. I love embossing in all its forms, with paste and stencils, dry embossing with folders or texture plates, and heat embossing.  I fell in love with card-making the first time I saw that powder melt - it was MAGIC, and I was hooked. 

I am also entering this card to Seize the birthday with toppings - Make the sentiment the focal point

Water color paper, vellum, cardstock, distress inks in Worn Lipstick, Picked Raspberry, and Dried Marigold,  delicata ink in Golden Glitz, and some Hero Arts gold embossing powder were my supplies for this card.


I dropped color on to the water color paper and let it dry. I really spent little time on this. The colors were just a beautiful yummy sherbert collection, and I thought they would look good with a bold gold embossed sentiment.


Thanks for stopping by!

Another week has flown by

And here I am nearing midnight working on a card for Muse #108.  Michele had used one of my most favorite set of colors - Gray, Yellow and White.
 
Isn't it a stunning combination of colors?  I started with those colors, but really wanted some black in there so I cut the new Essentials by Ellen's Bold Blooms out of black card stock, found a piece of black white and gray patterned paper in the March Simon Says Stamp card kit, and went to work.  For my sentiment I added Hello, from PTI's wet paint cuts. A few sequins and then mounting it on a lovely Basic Gray sheet by Stampin Up.


I love to stamp but this die cut card, works for me.  Thanks so much for stopping by!


Sunday, March 15, 2015

Paris

Paris, have you been there?  I was once there in my youth for about 17 hours; we ran and walked all over the city for the day and most of the night. We saw many of the attractions there, but missed out on the Louvre, it was closed that day. 

A good friend of mine is also quite fond of Paris, and when I think of Paris I remember how she loved the trip she took with her daughter several years ago. When I got the March Simon Says Stamp card kit with all its wonderful yellow's, gray's and springtime Paris feel...I knew I had to make her a card.


I used the stamp and one of the papers in the kit, a scrap of yellow paper and some black seam binding ribbon. The kit also contains a die which is a line of round holes, I used them to thread my ribbon.  I stamped a bit of tone on tone for the card base just to provide a bit of texture. I also stamped the flowers in Lemon Yellow Hero Arts ink onto the paper, along with a bit of soft granite and Lawn Fawn black licorice. I used  a pierced rectangle die from MFT to isolate my image and stamped "Friend".

The inside has another stamp from the set "you've been on  my mind" along with the flower images. I think she will enjoy the card.

Thursday, March 12, 2015

Retro Mix It Up

It has been a while since I used superfine glitter and sookwang tape...after being frustrated for a while I stumbled upon a happy result.

I started with some 110lb paper (I'll use much thinner card stock next time). I covered it with sookwang tape and die cut two pieces from Bold Blossoms, a new die by Essentials by Ellen.  The frustration came when no matter how many metal and paper shims I used I could not get the interior pieces to cut through the cardstock.   (Note the die cuts beautifully on normal cardstock, it is the tape and liner on thick cardstock that caused my incomplete cuts)  So I put that away, and started on the card base. I inked one line of the Hero Arts Arrows Pattern stencil in with Distress Ink mowed lawn.

Having taken a break from my flower and leaf, I was able to look at a new possibility.  I lifted the release paper off just the interior portions and put darker shades of glitter one them, burnished it and brushed away the loose pieces.  Next I pulled up the release paper from the intended die shapes glittered them with lighter shades of glitter.  The happy result is a full bloom and leaf!  YEA!  I used a sentiment from the Hero Arts set Many Birthday messages, and added a few pieces of sequins.


For my design I used the current sketch at Retrosketches, and I am also entering this to the Essentials by Ellen Mix It Up Challenge.

   Banner-MIX-it

Thanks so much for stopping by!

Joyful Wishes


I have two cards for three challenges.
1. Merry Monday's Current Challenge is Monochromatic Blue.
2. B is for ...- At Simon Says Stamp Monday Challenge

 Supplies:
 Inks - Versamark, Distress -Salty Ocean, Chipped Sapphire
 Embossing Powder - Hero Arts Silver
 Thread - Sulky Silver
 Papers - DCVW Foil Stack, Stampin Up Night of Navy
 Die - Lifestyle Crafts (To create Mask)


Simon Monday Challenge Blog

I turned the sketch.


Supplies:
Dies - Lifestyle Crafts, Lawn Fawn
Inks- Versamark, Distress - Chipped Sapphire and Black Soot
Embossing Folder - Sizzix
Carstock - Michaels 110 lb white, Stampin Up Poppy Parade, DCWV Metallic


Wednesday, March 11, 2015

CTS#113

I am fond of sketch challenges, and this week I am playing along with Cas(e) the Sketch #113. I love a center panel focal point and that is what we have on this one.


I started with my center piece and decided on a two tone watercolor backdrop. I used Pthalo Blue and Ultramarine for the blue shades, and Sap Green and a touch of Viridian for the green portion. I let it air dry. I cut an Elizabeth Crafts Daisy out of white card adding clear rock candy distress dry glitter to the petal outlines and the leaves only. I adhered this to the water color panel, matted the panel in a thin layer of white and added my banner flags of dotted vellum. Lastly I added the Stampin Up Sentiment and then the panel was mounted onto a black card base.

I love the drama and contrast of the white, bright colors and the black card base...Hubs does not.  He doesn't like black greeting cards. What do you think? Is the contrast worth the dark card base?

Thanks for stopping by!

Tuesday, March 10, 2015

Tag you're it #16

I loved this Tag You're it inspiration photo. I recently purchased a new stamp and die set from A Muse, and decided they would be perfect for this challenge.

I dic-cut the pieces first along with quite a few extras.  Then using pigment inks, I stamped the flowers and leaves. The hardest part for me is positioning the pieces.  Once they were arranged to my liking, I took a picture and glued them down, some with foam squares. 

I added some wink of stella over the dark pink bloom and the leaves.  Then I dug out some 4 mm Pretty Pink Posh sequins and glued them down.  I matted the tag in black and added a double seam binding bow in black. The sentiment comes from Stampin Up.


Supplies : A Muse stamps and Dies - Pretty Peonies. Inks- A Muse (Lichen, Berry, Blush), Mama Elephant - Mojito, Versafine -Onyx Black,  Seam Binding- Hug Snug, Paper- Michael's White-110lb card stock (cuts and takes color very nicely.) Black 65 lb.

http://tagyoureitchallenge.blogspot.ca/2015/02/tag-youre-it-challenge-16.html
Click to go to challenge post


Thanks for stopping by!

Saturday, March 7, 2015

Spring Scramble

I set the alarm this morning and woke up just a bit after 10, which is very early for me as I am usually up and about until 3 or 4 am.  Judy's scramble theme today was Flowers/Think Spring over at the Hero Arts Flickr group.

I grabbed three Hero Arts Stamps, and set to making a card.


I stamped first the background on the card base, then I stamped and colored the poppies. After die cutting the portion of the image I wanted on the card, I found a journaling card to act as a frame.  Once I knew where I was positioning the the frame I stamped the sentiment onto the card base. The flower layer was added with foam squares and a few bits of sequins were added as well.

Supplies:

Background - Life of the Party Dots CG298
Image - Delicate Blossom CL449
Sentiment - Messages with Flourish CL736
Sequins - Pretty Pink Posh
Inks - Versafine Onyx Black, Memento Tuxedo Black, Hero Arts Soft Vanilla
Layering Card - From SSS March Card kit
Die - PTI Notebook Paper
Markers shown in picture

Thanks for stopping by!


Friday, March 6, 2015

Celebrate

I started with the Retrosketches #155 challenge for the layout of this card.

 
I knew it would be one of the few St. Patrick's Day cards I would make this year. I used a scrap of shamrock paper, and a shamrock embossing folder for my panels. The die cut circle is a scrap that was in my round dies pocket.  I had a bit of the glitter paper left from another project and I cut the sentiment and a shamrock from that bit (the dies were from Cottage Cutz and Paper Smooches). I thought the card also needed a few bits of sequins (Pretty Pink Posh 4mm in Shamrock).


Since it is green I am also submitting this to Simon Says Stamp's Monday Challenge - Just a hint of Clover.

Thanks for stopping by!